Wednesday, December 23, 2015

Balloon Rocket

This balloon rocket is even a fun activity for me at 13! It is nice because we had all the supplies right at home!

What you need:
  • String
  • Tape
  • Straw 
  • Balloon
Simply slip the straw through the string and tape the string to two separate walls. Blow up your balloon and tape it to the straw (make sure you don't let any air out while taping it). Now let the air our of the balloon and watch it zoom across the room! 


~ Gracie Girl


Sunday, November 15, 2015

Things I Enjoy!

Books!


Crafts!  

Horses!!


My cockapoo: Winnie! 


Snow and Christmas!


Saturday, November 14, 2015

Homeade books

These books are really easy to make and so cute. They can work for gifts for friends of family or creative journals for yourself!


This picture looks super weird I know. The computer took the picture backwards. :)

What you need:
  • Drawing paper (I used 5 sheets of paper. It ends up being 10 pages in your book including the cover page.)
  • Hole punch
  • String
  • Something to decorate the front (I used buttons)
First you fold your drawing paper in half.  Then you hole punch the top and bottom of each piece of paper. Tie the string through the holes. Make sure it is loose enough to turn the pages. Finally, time to decorate!

Hope you enjoyed!
~ Gracie Girl


Thursday, October 29, 2015

Origami Mini Paper Books

One Saturday afternoon I was sitting in in my bedroom. Bored. I was longing to do something. A craft. I was looking on good old Pinterest for something. Surprisingly, I did find something! It was not the easiest craft in the world but I got it done. Here is a link to it: ORIGAMI MINI PAPER BOOKS   I suggest watching the video. I thought it was clearer.
Here is a picture of my paper book: Mine turned out much different then the one in the video.


Monday, September 21, 2015

Room Ideas


My sister and I have been doing some fun stuff with our room lately! Here are some pics!
By the way my sister and I are using the color coral for our room's accent color.


This a crate that my dad and I stained grey and then sanded down to get a weathered look!
We then hung it up in my room and I use it as a shelf! 
I love it!!!


We got this from Target We hold all our crafts in it!


Look whooo I found at a Garage sale!


My dad Spray painted two wooden E's and our old trash can. Then we decorated our E's and placed them in our Crate shelves.


My sister and I both got to choose one poster to hang in our room.
The Wolf is my sister's the Horse poster is mine.


The posters are from Hobby Lobby.


I found this adorable mini chalk board at Michael's!


Hope you enjoyed!


~ Gracie Girl

Painted feathers

Painted feathers don't really have a purpose except for decoration.
But they are cute and easy to make!  

All you need is:
  • Paint brush
  • Water color paint
  • Fake feathers
  • Water                                                                                             
You simply paint the feather the design and colors you like!
 Make sure you don't get to much water on the brush! It took me a couple tries before the paint would stay on the feather. And then wait for it to dry.

These are my two feathers:


We have this water color paint that has a sparkly tint to it and I think it is higher quality, because we tried to use another brand it it  just did not work all that well. So I hope that whatever paint you have works for your feather!


~ Gracie Girl


Monday, July 20, 2015

Tissue Paper Flower

Here is how to make a tissue paper flower!

What you need:
  • Square tissue paper 
  • Pencil
  • Scissors 
  • Hole punch
  • Twine 


Fold the your tissue paper in half twice.


Fold it again... 


And again.


Now, fold it into a triangle, then into a smaller triangle.


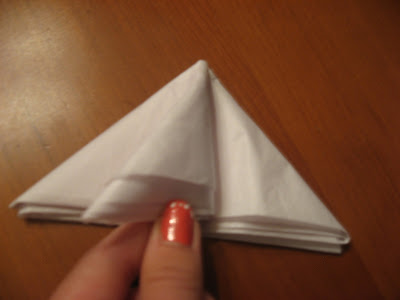
Fold just half of the triangle back.

Then fold the other half of the triangle back to the other side.


Draw a half circle. Make sure that the folded edge is the point.


Cut on the pencil mark.


Unfold. Place the tissue paper layers on each other rotating the layers each time.


Fold in half and punch a hole in the middle and tie some twine to the hole.
(As you can see I failed there so I had to punch it off to the side).


Lift a layer at a time and scrunch it in to a cone shape. 
Continue until you have done that with each layer.


It should look like this in the end!

You can tie these on to gifts or use them for decoration!
Hope you enjoyed!

~Gracie Girl

Wednesday, June 24, 2015

Summer!


I decided to take some pictures of the beautiful summer flowers around our house! My sister took some pics as well!
Here they are:


I love the purple flowers with the white ones!!!!!


I love this scene!


This is one of my favorite plants!


I don't know why, but I just like this picture!


This is some of the tall grass that is in our front yard!


~Hope you enjoy~

Sunday, June 21, 2015

More Room Decorations!


Here are some more room decoration ideas:
Sorry the pics are bad.


Paper lanterns! 
We got these at Target on sale for only $1


This one is by my bed the other one is in my closet.


Tissue paper flowers! 
We got these from a friend and put them above 
the closet and above the door.


I made this cupcake a couple of years ago!
 I put this by my bed above the shelf.


Posters are really fun and cute to hang up!
There is a Bible verse under the word whatever, sorry it is blurry!


My Grandma made these vinyl designs with her 
Silhouette Cameo!


Those ones were my sister's. She put them by her bed!


This one is mine! I also put it by my bed!
They are really cool looking and fun!


Hope you enjoyed!